Here's the worst part about any DIY project, you become an expert through practice but your practice is not always pretty. When it comes to DIY home renovation projects, practicing can be expensive and time-consuming so redoing your practice job is not always an option.
Tiling falls into the too laborious and expensive to re-do category.
Here are my top 10 realistic tips for a first-time tiler to get a beautiful result while you are still learning! This is the practical guide I wish I had had when I tiled 2 floors, 2 backsplashes and 1 shower (including the ceiling) in the span of a few months with zero prior experience.
Now before I scare you away with the mistakes I made, tiling has been one of the most rewarding skills to learn there is a permanence to cementing things to your walls that is very satisfying. I have a whole Pinterest board of just for fun tile projects started, so don't let tiling intimidate you for years like it did me! Its a total blast once you build your skills.
This kind of backsplash tile is perfect for beginners; the natural variation in the finish hides mistakes.
Choose an easy tile type to work with.
Oh my does Claire of the past wish someone had told me this! I started on tile difficulty level 10 by using natural stone and glass tiles for my first 3 projects. Natural stone and glass tiles are more challenging to cut cleanly and the variation in natural stone tile is tricky to manage as a first-time tiler (mainly keeping it level during install due to the varying tile thickness)
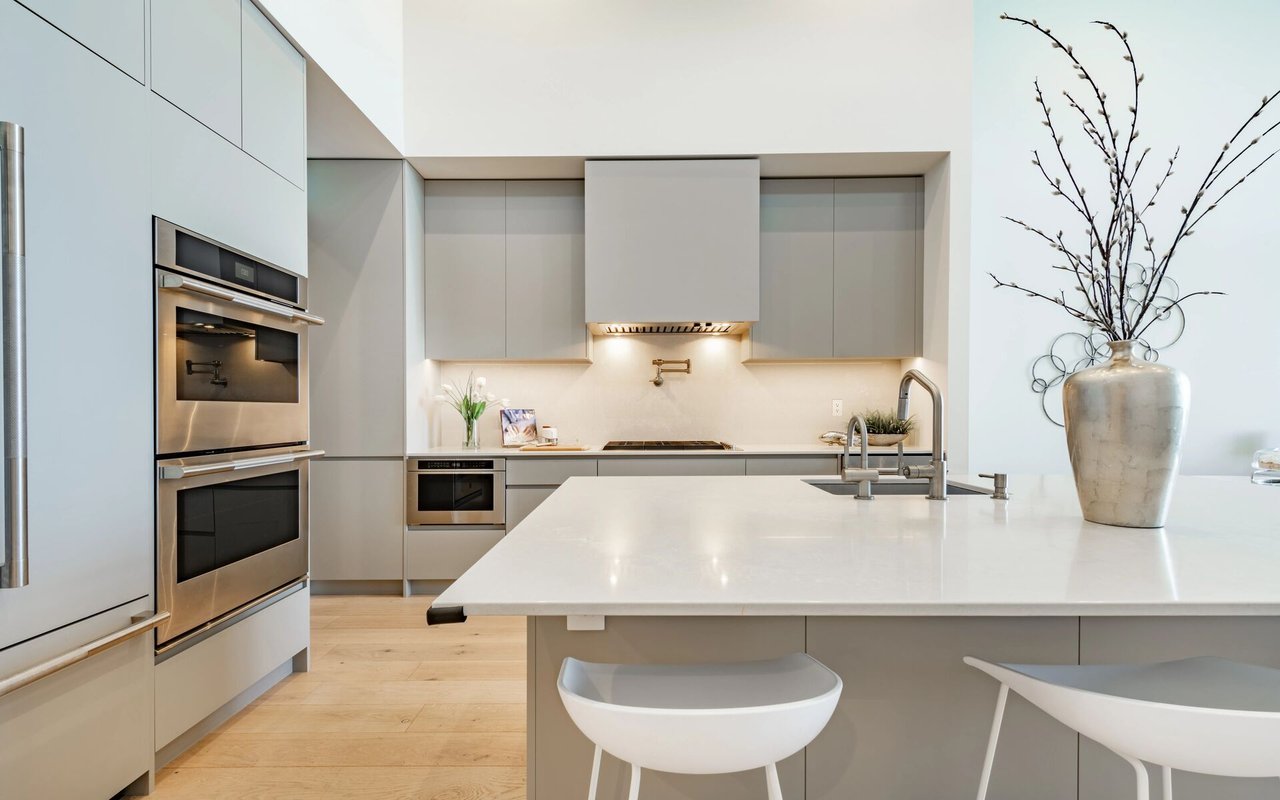
My recommendation is to start with a porcelain or ceramic tile, these tiles will be uniform in size and depth making it easier to get a consistent install and will cut cleanly without an expert touch on the tile saw. Even better, if you can find a ceramic tile that has a bit of variation in the texture/pattern this will further help to disguise any less than perfect installation on your part. The backsplash I tiled in my duplexs top unit is a perfect example (see above photo!).
Match your grout color to your tile color.
This is the easiest way to hide any of your learning mistakes, contrasting grout and tiles will amplify any grout lines or tiles that arent perfectly level and spaced. Cleaning grout off tiles is another acquired skill and any excess grout in a contrasting color will make your whole job look messy.
Dont ask me how many hours I spent painstakingly cleaning up the edges on that green shower tile with the contrasting white trim!
Start with a backsplash.
There is one big win with starting with a backsplash the scope is small, thus:
- It will not exhaust/demoralize you
- You can take your time to get all the cuts perfect while still making significant progress in a short amount of time.
- Mistakes will be easier to detect and solve for. Whereas with larger projects sometimes mistakes are found when it is too far gone to salvage (ask me how I know :/ )
- Planning is much easier, only need to consider the edges to avoid slivers and plan for outlets.
Use the pre-mixed mortar & grout.
You do not win any additional points for working harder. When you are starting simply getting the tiles on the wall/floor level and consistently spaced is enough to be learning, no need to add in the science of mixing grout to the perfect consistency.
The biggest tip for grout/mortar is to READ THE LABEL. Read it in the store, read it when you get home, read it again before you start using the product and make sure your tile and the substrate you are applying to match the mortar/grout specifications you have chosen. One of the biggest mistakes I see and have committed myself is using the wrong mortar/grout for your project. Tiling specifications feel overwhelmingly complex for your first project but I promise it is as simple as reading the label and double checking to get it right.
(My mistake was accidentally using *fast drying* mortar and it dried too fast for my beginner pace to properly level a floor tile and now that tile is forever slightly raised.oops. Moral of the story: read the label but also the floor is fine and no one has been injured by or honestly even noticed my mistake.)
Biggest callouts for choosing mortar and grout:
Grout: Sanded vs. Unsanded sanded is for larger grout spacing and tiles that will not scratch easily (ex. ceramic glazed tiles) whereas unsanded is for fragile tiles and smaller grout spacing.
Mortar/Thinset/Tile Adhesive: Mortar, I believe, is for brick laying but I see Thinset and mortar used interchangeably. Thinset is specific version of mortar that is more of an adhesive for use when laying tiles. Tile adhesive can be used for smaller tile applications (and I find it the cleanest and easiest to work with). As always read the label to make sure the specific version of adhesive you are using is correct for your application there are different versions and variables and if the wrong kind is used your tiles may not adhere or the mortar may not be able to dry fully.

Plan, dry test, level – repeat.
As is true with all DIY projects planning is 90% of the work and the execution is a measly 10%, with tiling I would argue that planning is about 99.9% of the effort.
Backsplashes plan from your most visible edge, depending on your tile pattern it will vary what kind of pieces you want that edge but start your pattern from the most visible edge for the best result (or from the center if you want the tile centered on a faucet/window/etc.). Really you are looking to avoid sliver pieces. Do a dry lay of one row of your tiles and if you see that youll have tiny sliver pieces, adjust your starting point until your pattern allows for a larger piece of tile on each end.
Flooring dry lay the entire floor. Saying it again because its that important dry lay the entire floor. A dry lay is when you plan out the entire floor with tile and spacers and make all your cuts prior to cementing everything down with mortar. Yes, it feels like tiling a floor twice, but I promise future you with a tub of rapidly drying mortar will thank past you for doing a complete dry lay.
I learned this lesson the hard way by semi-dry laying a floor and having it go completely wonky on me during install. Thankfully I was able to salvage it by following the above rule of match your grout to your tile so once grouted you cant tell where I needed to fudge the grout spacing to get the tile back on track.
Build tile off of a level straight edge.
Unless you have a new build home where you know everything is level and square do not start your tile project off of your countertop/tub/edge of your floor and expect that to be a level starting point. Most of these will be slightly off level, and as your tile project builds on itself it will be very apparent it has gone askew.
For floors mark the center of your room and start from the center working your way out building off every tile.
For backsplashes/showers create a level line 1 row of tiles above the base of your project. Draw a level line and then screw a level straight edge (I like using a schulter for this) to rest your first row of tiles on this will ensure as you build your tiles up, none of them start slowly sliding down the wall. Once you remove your straightedge add in your last row of tiles and caulk between the countertop/tub to disguise any level discrepancies.
Use tile spacers that also help level.
Use the ones that both space and level your tiles, you can get them for both floors and wall applications. You wont regret the extra help.
Getting all the “fuzzy” edges cleaned up on this grout was almost as time consuming as installing the tile.
Clean, clean, clean and clean some more. At every step.
It is SO MUCH easier to clean before mortar/grout before it has set than after. Clean often as you go and before you call it a night. Freshly dried mortar is still easier to clean than mortar that has set for 24+ hours.
You have more time than you think, go slow and be patient with yourself.
There is nothing that brings out panic in me like a tub of drying mortar heres the secret to tiling: if you get overwhelmed in the moment you can walk away. Clean up any wet mortar around the tiles you have installed so when youre ready you can start again. Dont feed into the panic, you have all the time you need.
To help avoid the panic pick a mortar that has a longer dry time that will accommodate a beginners pace. This extra dry time also gives you the opportunity to set the tiles and wiggle them into *just* the right spot. For old homes especially where nothing is level or square this bit of play in the mortar will serve you well to finesse a perfect result.
Buy more materials than you think you need.
This is another golden rule of any DIY project but is extra important when tiling, woodworking projects are relatively easy to put down if you need to run to the store. Tiling is not, your open/mixed materials will cement on you and the cleaning required to pause is labor intensive. When you are calculating tile needed 20% extra is a safe bet. As for mortar and grout I have found the area covered listed on the buckets/bags to be accurate. Yet, it never hurts to buy extra and return it at the end of your project if you dont use it.
The resulting pride from building something so permanent is worth the learning curve!
For my first 3 tiling projects I felt like absolutely never again why would anyone choose to do this with their life but around projects 4-5 I started really getting the hang of tilingand now I am literally *dreaming* up projects so I can tile more. Trust the process, give yourself grace and most importantly stop reading this blog post and go take action!
Any questions? Im always here to help.
xx,
Claire